 @homelifeabroad.com #diycards #christmascards")
Making your own Christmas cards is a fun and frugal way to personalize your Christmas greetings. Just imagine the pleasant surprise of receiving a unique, hand worked card instead of the usual Xmas cards on sale!
I made these 3 easy Christmas card designs this year to give to my friends. Each comes with its own template – easy to print and then cut as directed. Enjoy them, give the cards away, and be creative with them! I would love to see pictures of the designs if you make them at home. (Just post them on our Facebook page: https://www.facebook.com/homelifeabroad)
Templates:
1) Snowman card: Download template
2) Merry Christmas card: Download template
3) Christmas tree card: Download template
Instructions:
- Print your template on paper. Regular paper printer works okay, thicker paper is best, but you can pick out any paper you want.
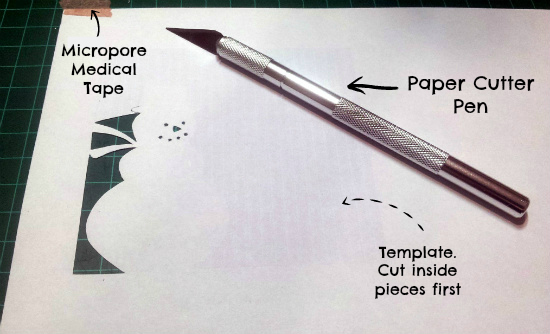
- Stick your print-out to your cutting mat. If you don’t have a cutting mat, a kitchen cutting board may do as well. I use Micropore medical tape to carefully stick the paper onto the mat – it doesn’t tear the paper once removed, nor does it leave a sticky residue.
- You will need a paper cutter and a ruler for edges.
- Start cutting out the gray areas. You always want to work from the inside out as the paper will be weakened.
- Use your finger to stabilize the paper and not allow it to break off.
- Once the design is cut, use the ruler to cut the sides of the card. Fold the result into a card.
- Use another paper within the card to create a background. You can write on it or design something on it as well.
- Enjoy your paper cut Christmas card & rest your fingers!
![]()
Disclaimer: These are my designs so please don’t steal. Feel free to link to this post and use the image for linking but do attribute this site as a source and link to the post.


You are just way to crafty. Where do you find the time to make your own cards? I would much rather get a card that is made with love, instead of mass produced ones.
Actually, I don’t have time. But I have few Christmas-celebrating friends, considering I live in Israel now and I’m Jewish. 🙂 So it balances out!
I love getting homemade cards. I always end up getting one or two every year and they totally make my day because I know someone took the time to make it just for me.
Oh wow these look amazing! I shall be giving this a try! Thank you
I’m probably too clumsy to even attempt this-sure wish I could do it myself–I can barely get a gift wrapped properly!
Those are lovely cards! Thanks for the freebies! Homemade cards are always the best 🙂
How cute are these!! I used to be crafty…. Maybe I need to start being crafty again! I love these so much!
Thanks for including the template, that was very nice, and these are great!
The “merry Christmas” design is so pretty! I love it when awesome, crafty people like you share these kinds of things that make lame people like me look awesome! 🙂
I love the snowman card. These are all quite elegant designs. I wish I had time to make home made Christmas cards. I might try a few for close friends and family. Thanks for the tip.
I wish I hadn’t already purchased our Christmas cards; this tutorial makes this idea seem easy enough that I think I could pull it off! I especially love the snowman design. Hmmm, maybe I can find the receipt for these boxed cards and still make it happen… 😉
These are great templates, definitely perfect for the season
Nice! Thanks for sharing these, I love making cards each year this can be something I can do this weekend
These are so cute. I love to make cards for my family and friends too.
I have the items I need for this, I will do this tomorrow with my son, Those are so cute.
I love all three of these designs. These are really quite lovely. I might just give this a try. I still have time.
I never thought I could do something like this but you’ve proven me wrong. It’s possible! These are gorgeous.
Wow, I love these. We used to do stuff like that in art school!
This is so cool! I love making DIY stuff. I am thinking about making a commitment and doing all my cards for 2014 DIY!
I used to make Christmas cards and I loved that they were a bit more personal. This would be great for the kids to do for the grandparents. 🙂
Merry Christmas one is my favorite! But seems like a lot of work!
Looks wonderful!