The play has an important role in baby’s development and it teaches skills that babies will use in life. For playing toys are needed. Buying toys for your kids can be expensive, but there are ways to save money on toys.
One of the possibilities to save money on toys is to search ideas for DIY toys and create them yourself.
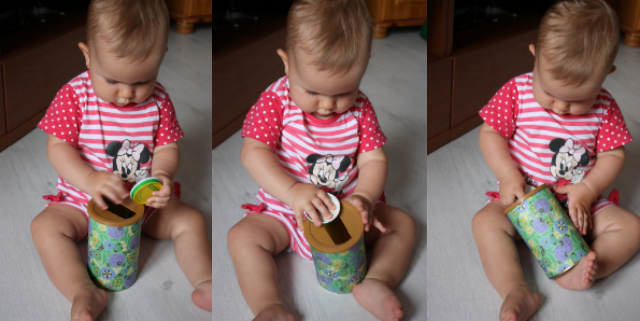
I found this posting can idea on Pinterest some time ago, but never had time to make it. Today, when Sofia was getting bored with playing with her toys, I remembered this idea and here is the result.

We already have an activity cube with a posting box option, but my daughter is too little to understand how it works. This posting can is far more baby friendly, it’s really easy to make, takes a little time and doesn’t cost much! Besides, this toy helps to promote hand to eye coordination, fine motor skills, dexterity, and patience!
Here are the things you need for creating this entertaining posting can:
- empty canister (cocoa, coffee etc.)
- decorative paper
- baby food jar lids (metal food lids)
- glue
- scissors/knife
- different pictures/images
- tape/self-adhesive transparent paper
When you have gathered all the necessary, you can start putting it together.
Firstly, clean the container you are using. I used a metal container, so when those lids fall to the bottom of the can, it makes a loud noise. When the container is clean, remove the plastic lid and cut a slot big enough for the lids go through easily. Hemm, my slot didn’t come out as beautiful as I wished for, but at least it fills its purpose.
Now you can start decorating the can. Cut a piece of paper big enough to cover the can and glue it on (or use self-adhesive paper). I used a decorative paper from Tiger Store. Instead of paper, you can use fabric, or maybe even stickers. But whatever you use, make it bright. Babies and toddlers love colorful items. If you are using decorative paper, it’s a good idea to cover it with transparent adhesive paper, so when your baby wants to chew the can, he won’t be able to eat the paper.
When the can is ready, it’s time to prepare the lids. I used baby food jar lids, but other smaller lids work well too. Just remember to check if they go through the slot you cut. You can use plain lids without decorating if you wish. I let Sofia play first with undecorated lids but then decided to destroy some magazines and cut out different baby faces. For toddlers, you can substitute faces with animals, numbers, letters, etc. Glue the images on lids and secure the borders or whole image with tape or self-adhesive transparent paper.
Now let your kid play!


What a great and creative idea! Looks like a happy baby!
Love this DIY and the baby is just too cute
Awe… love this idea and so simple to do. Thank you
That is so creative! I love how you added pictures, what a nice touch and great way to reuse and upcycle.
That is adorable!!! Babies love things like this!
This is such a great idea. I am sure my boys would love this.
Just saw this on Pinterest and added it to my list of things to do 🙂
I am sure this could be a cute gift idea as well. 🙂
What a cute idea! I love home made toys!
Oh that’s a really great idea for a little one!
This is a really cute idea and looks like something just about any mom can do!
COOL! I LOVE BEING CREATIVE I WILL TRY THIS
Fabulous idea! Thanks for the inspiration.
I love this project Ave. I think we often forget that babies are happy with simple toys.. they don’t need the overly complicated ones just yet. 🙂
That’s so easy and cute and I love the faces on there. Babies LOVE faces!
What a fun DIY toy for babies….babies love looking at the faces of other babies, so it’s a win-win!
Thats a super cute idea!
The toddlers I watch would have a hay day with this one ;0)
That is a cute idea for a children’s toy. It is also nice because it gives new life to an old product.
I made one of these out of a tea tin to “save money” for my new doll… it’s always empty 🙁 but hey!! i have one and that’s all that matters xD
How fun and soo simple.. it’s the little things that keep the kids entertained… love it. Thanks for sharing and totally gonna make this for some friends with little ones…
This is probably the coolest craft I have seen in quite some time. I am going to do this over the weekend for my niece, who just turned one. She loves having things in her hands that she can play with repeatedly and this will amaze her. Love it.
What a clever idea! I just love that! This would make an amazing gift too. Thank you!
Very cute project! Hopefully my son doesn’t try to eat them!
This is so cute! I will remember this when I’m a mom. – Emmy
I am all for resuing things around the house instead of sticking it in the trash right away and the kiddos like to play with things like empty boxes and pots and pans more anyway.
Love this DIY. And a great learning tool, also.
I love this diy for my 11 mos old daughter.. especially since its cheap to make and she likes to throw things this will help her not to throw and put things inside.. cute…
What a great idea and very neat DIY project!
So cute and truly not expensive! Love this idea very much. Thanks for sharing.
SUPER CUTE. i did a craft with a can to make a headband holder. there’s so much we can do for next to Nothing cost wise! and your little one clearly enjoys 🙂
Pinterest is a constant source of endless amazing ideas. These look fab and clearly a winner with the children. We used to make playthings out of anything when we were kids but today they are so used to store bought toys. It is great to see you making your own toys!
I prefer DIY projects…half the price and I’m not worried about them breaking it.
Great idea!! Play is so important in development and kids learn so much. What a great learning toy 🙂
That’s a really cute hand-made toy! The photos are adorable.
This is a great idea to help them with eye hand coordination as well!
Absolutely love this idea!
That is super cute!
What a cool project!!! Hurrah for following through on a Pinterest project. That’s so totally on my bucket list, hahaha
this is really cool! Wish I knew of this when mine were babies.
What a cute idea! I think my youngest would like this. He likes putting things in bowls/containers.